Hi,
I’ve had a bit of trouble with modifying and compiling the game’s source code for a mod so I thought I’ll just share this here, because the coding part of the ModWiki barely exists.
Of course first you need the retail game v1.5 with SDK.
Here is an absolutely necessary tutorial https://modwiki.xnet.fi/How_to_build_the_SDK_on_Windows.
It says that you need Visual Studio 2005 C++. What you need to know is that you need the full ISO version and not the Web Installer which needs you to register the product on a dead link after 30 days.
Here is the official ISO from Microsoft.
You can dismiss the compatibility warnings on Windows 8.1, it works fine (I suppose same for earlier Windows).
You also need to install the platform SDK for Windows Server 2003 like it is said in the tutorial.
After that you can open VS2005 and load the solution. It will not build yet, you will have errors.
What you have to do is to tell VS2005 to go look for the Platform SDK libraries.
You need to go to “Tools–>Options” then go in “Projects and Solutions–>VC++ Directories”.
In “include files” you need to add a new line pointing to where you installed The Windows Server 2003 platform SDK. For example :
C:\Program Files (x86)\Microsoft Platform SDK\Include
You need to do the same for “library files”.
C:\Program Files (x86)\Microsoft Platform SDK\Lib
At this point, the code should compile.
Now, the tutorial given at the beginning of this post tells you to do this :
You will need to add the following lines to ‘SDK 1.5/source/framework/BuildDefines.inc’:
#ifndef SD_PUBLIC_BUILD
    #define SD_PUBLIC_BUILD
#endif
Actually, you also need to #define SD_PUBLIC_TOOLS. If you don’t you will get an error dialog box about “wrong API_VERSION” when you try your code with the SDK exe.
So, my “BuildDefines.inc” file consists of this :
// Public defines go here
#ifndef SD_PUBLIC_BUILD
	#define SD_PUBLIC_BUILD
#endif

#ifndef SD_PUBLIC_TOOLS
	#define SD_PUBLIC_TOOLS
#endif
To test that the DLL is actually loaded ingame, we will add one line of code in Game/Entity.cpp inside the spawn function (taken from here) :
// ...
/*
================
idEntity::Spawn
================
*/
void idEntity::Spawn( void ) {
	gameLocal.RegisterEntity( this );

	const char* classname = spawnArgs.GetString( "classname" );
	if ( *classname ) {

		const idDeclEntityDef *def = declHolder.declEntityDefType.LocalFind( classname, false );
		if ( def )
		{
			[B]gameLocal.Printf("Hello %s!
", classname);[/B]
			entityDefNumber = def->Index();
		}
	}
// ...
}
// ...
Now, your DLL is “SDK-ready”, you can build the code and get the DLL from the build output.
Now, you have to go to your SDK1.5 root folder and rename “gamex86.dll” to something unusable like “gamex86.dll.old” (to have a working backup).
Now, copy your freshly made DLL to the SDK1.5 root folder (to replace the old one that you have renamed).
This info is from the SDK readme.txt :
- You can find the final gamex86.dll in source\build\win32<configuration name>
Copy it to the same folder as your etqw.exe and the game will automatically load your new dll.
- We recommend setting up a post-build event to automatically copy the dll to the game folder.
As suggested, you can use XCOPY or change the build output directory to avoid copying the DLL manually every time.
Now, you can use the SDK launcher to launch the game and, for example, launch the Valley map.
To display the console : Ctrl+Alt+~
Then you can set “com_allowconsole” to 1 so that later only “~” key will be needed to display/hide the console.
Now, in the console, type : “devmap valley”. You might need to set “si_rules” to “sdGameRulesObjective” if it doesn’t work because the game expects a campaign and not a single map by default.
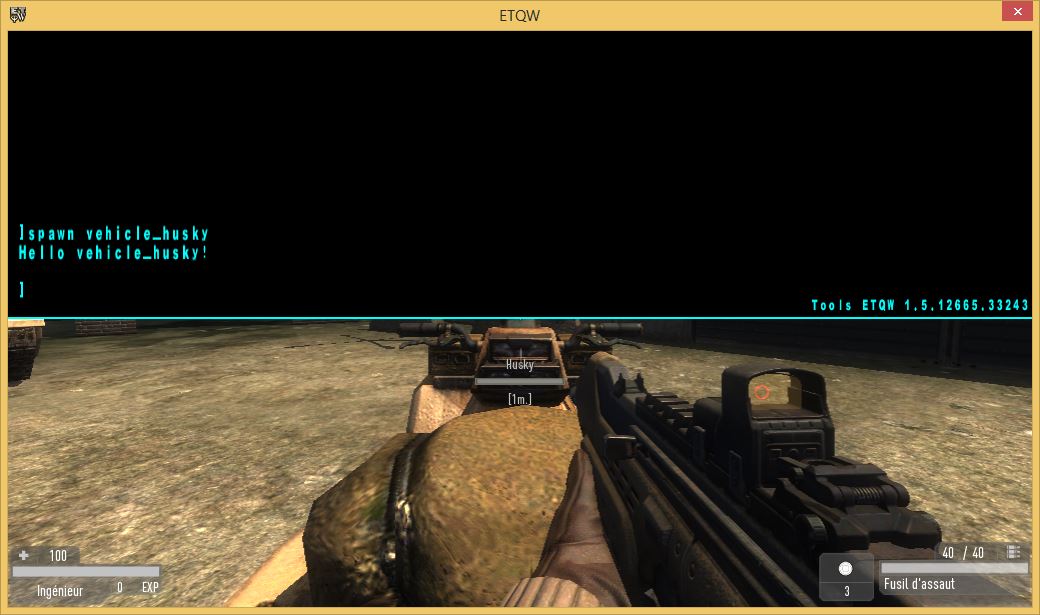
Now, you can do : “spawn vehicle_husky” and see what happens.
As you can see, the message “Hello vehicle_husky!” appears in the console. It works! Wuhu!:stroggbanana:
I hope this helped you, if you have anything to add or any remarks, feel free to say it here!


