In this Designer Dissection, Level Designer AK leads us through the design decisions behind Dirty Bomb’s next Execution map. Check out the Prototype Showcase post for the full rundown of the event, and try Gallery out for yourself in the Server Browser and in Private Matches until the 2nd of January.
Goals of the Map
Travel times
Good pacing is an extremely important element as it keeps the game exciting and engaging. Nailing the travel times in Gallery was the first and most important stage of the block-out. Controlling the pacing ensures the map is exciting and dramatic. It is essential to ensure the time to the first encounter or objective is not long enough for players to become frustrated or bored.
Intuitive Routes
Primary and secondary (bypass) routes flow well from one area to the next. They are clear and easily readable. Restricting the player’s choice to 2 routes at any branch creates simplicity within the flow from one area to the next. This simplicity of fewer routes means higher chances of an early encounter with the enemy.
Additional secondary/flanking routes have been incorporated into the map. If a primary route is locked down, a flanking route will give access. Many of Gallery’s bypass routes utilize wall hops or long jumps which have been used in interesting ways for players to discover, adding excitement to the flow of the map whilst navigating into strategic positions.
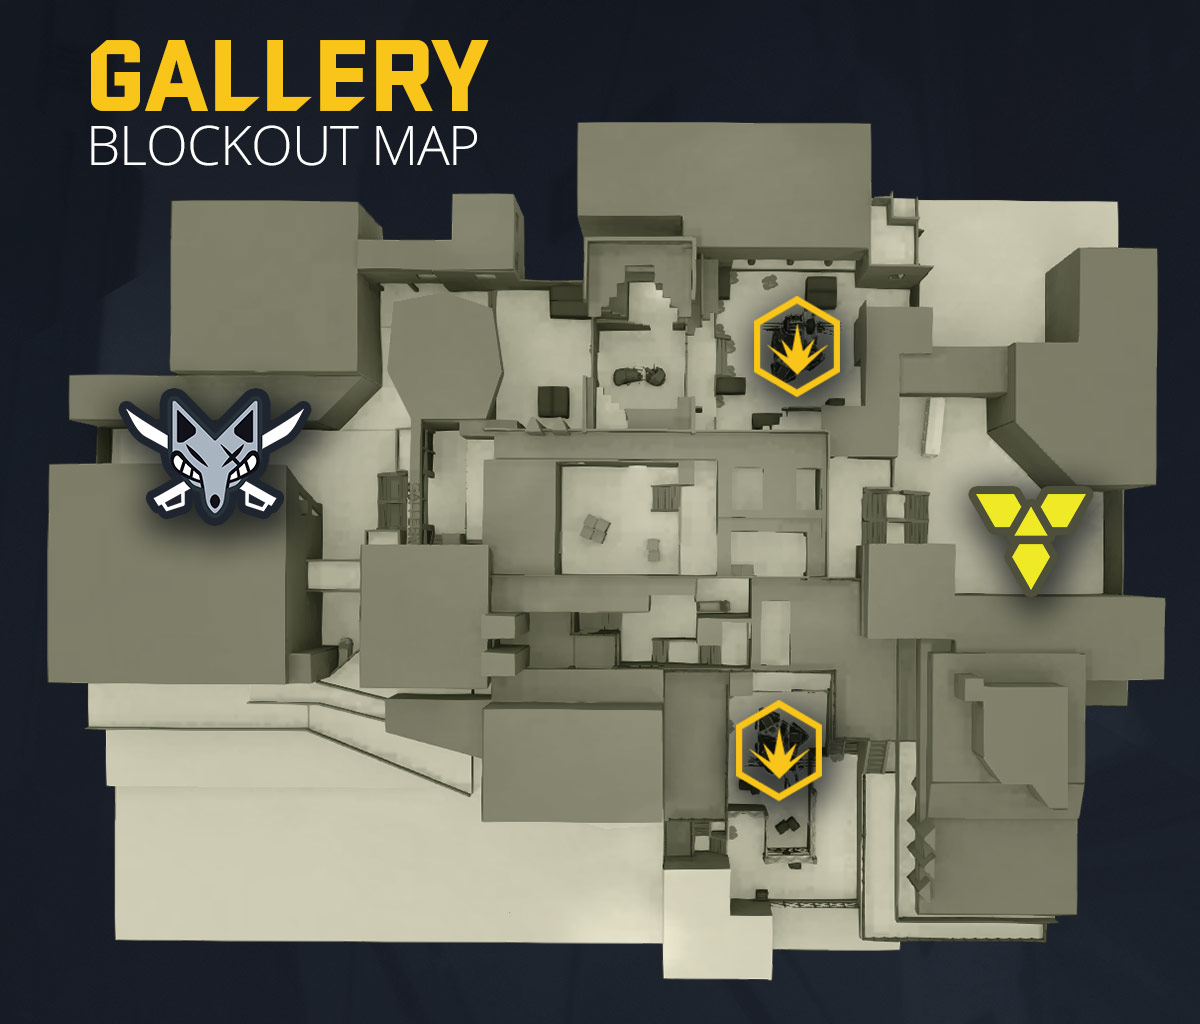
Player guidance is really important and Pylon signs have been placed throughout the map to direct players. Creating a visual language is the next step to aid with player guidance when art is added.
Balanced Combat Areas
Combat areas have been designed to be balanced for both Jackal and CDA. The use of trick jumps can get players out of sticky situations or into a better defensive or offensive positions. However, there is always a risk to reward. To gain a better position the player may have to reveal their location briefly to reach the vantage point, or the vantage point may have strong offensive elements but no cover from its flank.
Cater to all Merc styles
It’s true that some Mercs are less useful in certain maps than others. For example, Shotgun Mercs such as Aura and Proxy who rely upon CQC have fewer opportunities in Overground compared to Market where they are far more appealing. The architectural theme of Gallery lends itself well to long, medium and short range Mercs with wide open areas, tight corridor sections and multi-story verticality. Gallery has utilized this architectural theme to its fullest capabilities and maximised on combat varieties.
Utilise all Merc-hanics™
Dirty Bomb’s core gameplay mechanics are what sets it apart from other first person shooters. Gallery will create opportunities for players to use all gameplay mechanics –
- Deployables – The architectural layout of the map has many corners and sets of stairs with surprise areas for the deployment of mines and turrets. Once art is in place, fallen leaves will decorate the surroundings to give the impression of autumn and create prime areas to obscure mine placement.
- Air Support – Air support will be viable over the outside areas of the map, and some buildings are destroyed to further create opportunities.
- Trick Jumps – Trick jumps are integral to the game and have been strategically positioned around the map to gain access to bypass routes and vantage points. Trick jumps are intuitive and fun to discover and pull off, and (most of them) are clearly marked with footprint decals.
Have you played Gallery? Where does it succeed and how could it be improved? Let us know in the comments below!


